Saturday, February 9, 2008

Lemon Cream Cheese Cupcakes

I tried another cupcake recipe on a Saturday, as I wasn't entirely satisfied with the previous cupcake that I tried – it turned dry and dense within a day. I needed something that could keep soft and fluffy for at least a day when I bring the cakes to Malaysia.

This recipe is from Betty Saw's book and is posted on the net by various bloggers. I'm glad that the texture remained soft and fluffy even after a day! Also, I think the taste is good – full of lemony and creamy goodness. However, the sides and bottoms browned too fast – looks burnt, but doesn't taste burnt (phew!). Think that's because my mini muffin tin was the non-stick, black version. Think I will bake at a reduced temperature of 160 deg C to overcome this. Also, will fill the muffin tins abt ½ to 2/3, so that the cupcakes will not raise over the paper cases and become too brown….

On another occasion, I varied with orange, but I think lemon is the best!

Wednesday, January 23, 2008

2008 Chinese New Year Kitchen – Sugee Cookies Part II


Last weekend, I tried another version of Sugee Cookies. During the week, I was inspired to adapt the Peanut Cookie recipe: omit the peanuts and maybe add almonds and/or semolina. I searched the internet to check whether other adjustments were required. Lo and behold, I saw a recipe on the net (oops, forgot to check that website!) that posted a Sugee Cookie recipe that was close to the Peanut Cookie recipe. So, it can be done….hmmm….

For this batch of Sugee Cookies, I used sunflower oil, added salt and omitted the peanuts. Hubby and myself didn't like the taste when the cookies fresh from the oven. However, after letting them rest for a day or two, the taste was much better. Hubby liked them so much that he ate at least 10 at a go! Well, I still have my reservations, but I will do a batch specially for my Hubby for cny….

Perhaps, I will try using a mixture of corn oil and butter the next time. Somehow, I feel that sunflower oil isn't suitable….Maybe that's a personal preference.

2008 Chinese New Year Kitchen - Soft and Fluffy Mini Cupcakes


Recipe was taken from Cuen who posted in Imperial Kitchen. I used the one posted by Hugbear, who adapted it and posted it onto her website. The cupcakes were baked in a mini cupcake pan. These were light, soft, fluffy and not too sweet. As such, they are suitable for those who do not have a sweet tooth and those who like their cupcakes light and fluffy. I think I will bake this for hubby's grandparents, as this is soft and fluffy and not-too-sweet.


Calla's notes on the recipe

  • I added cocoa to get the chocolate flavour i liked: added 4 tsp cocoa, sifted into and fold into approximately 1/3 batter (i halved the recipe). Although the chocolate ones were still fluffy, not as fluffy as the vanilla ones. Vanilla one has better texture. But this could be because i didn't reduce flour when i added the cocoa.
  • I reduced the sugar further. I personally don't mind it a teeny weeny bit sweeter, but it could be alright for those who do not have a sweet tooth.
  • First batch baked at approximately 150 – 160 deg (based on oven thermometer), for 20 min; trays rotated mid-way and top heating element switched on. Think i baked too long, sides were crusty, but tops had no cracks.
  • Second batch baked at approximately 170 deg (based on oven thermometer), for 15 min; trays rotated mid-way. Top heating element switched on only for the last 2 – 3 min, as the temp was too hot and the tops had cracked. I forgot to switch off the heating element when i placed in the second batch.
  • Prefer the texture of the second batch. Will test to bake at 160 deg for 15 min, to achieve not-so-crusty sides, more fluffy texture and no-cracks top.
  • Also don't fill the muffin trays to the brim. Batter spills over and becomes crusty. Fill to about 2/3 full. Cupcakes will rise.

Update: as in any cupcakes, these will turn dense after a day or two. Best eaten when fresh from the oven…

2008 Chinese New Year Test Kitchen – Melting Moments


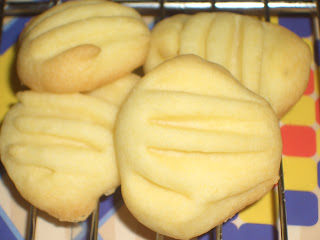
Over the weekend, I baked melting moments. Recipe was taken from the Kitchen Capers Forum which was posted by Connie (Thanks, Connie!). The dough was really soft, so when i pressed the fork into the dough as a form of deco, I couldn't lift the fork from the dough! As a result, the resulting cookie looked like sea-shell(??), rather than round, although i rolled into balls....Haha....

I found the cookie very light and buttery, while Hubby found it too powdery. I think Mum will like it as it's buttery. Well, I guess I will not do this for cny unless Mum requests for it.

Calla's notes on the recipe:

  • as the dough was soft, i chilled the dough prior to rolling into balls. Chill again prior to flattening it with a fork.

Wednesday, January 16, 2008

2008 Chinese New Year Test Kitchen – Cranberry Swirl Cheesecake


My MIL requested for a tart cheesecake for the coming cny. I thought that since I needed to finish the cranberry sauce, I decided to use it in the cheesecake for her. I used the cranberry swirl cheesecake recipe in the Epicurious website. I made a few modifications since I didn't make the cranberry sauce myself, but used the one from Crabtree & Evelyn. The cranberry sauce with orange by Crabtree & Evelyn was delicious on its own. It's packed with fruit.

Back to the cheesecake.... I'm extremly pleased with the results - there were no cracks, cake was firm, yet texture was smooth. My hubby terms it as "swishingly soft". However, I can't find the cranberries nor a distinct cranberry flavour, after dumping in at least 2/3 of the 16oz bottle into the batter! Very light swirls and virtually all cranberry sauce sank to the bottom.... I think I will add the entire 16oz bottle into a small bit of batter in my next bake....


In any case, I think I will be using this recipe as my base for all cheesecakes.... You should try it, it's really a yummy cheesecake, despite the negligible cranberry flavour.

Calla's notes on the recipes:
  • I used oreo cookies for the crust, which is a good combination.
  • I used 3 250g-packets of cream cheese.
  • As I used a commercially-made sauce, I reduced the sugar to 170g.
  • I used a 200g-packet of sour cream, with no apparent adverse results.
  • I used 60g of whipping cream.
  • I added zest of 1 orange - cranberry & orange go well together!
  • I originally wanted to swirl the sauce into the cheesecake. However I noted that the sauce sank to the bottom! In a bid to save, I added the sauce to some of the cheesecake batter. But I think I added too little sauce and the marbling was not apparent. To experiment on the proportions again....
  • I baked in a water bath at 160 deg C. But from my oven thermometer, I noted that it hardly climbed above 100 deg C. As such, I thought I better baked it longer. In all, I baked it about 2 hours, instead of the stipulated 1h 15min.
I made some observations while preparing the cheesecake:
  • I first beat the cream cheese at medium speed till it flicks off easily from the spatula/beater. Scraping down the sides and from the bottom is important, as there are bits of unprocessed cream cheese stuck at the sides and bottom.
  • I then add in the sugar and beat it at medium speed till drops easily from the spatula/beater.
  • After that, I beat in, by hand, the sour cream, whipping cream, orange zest and vanilla essence. I also tried to eliminate, as much as possible, any lumps in the sour cream and whipping cream.
  • The eggs went in next, one by one, incorporating into the batter (again by hand) before adding the next one.
  • I also cleaned my spatula and sides of the mixing bowl, esp after adding the sugar, regularly to get rid of unprocessed cream cheese

2008 Chinese New Year Test Kitchen – Sugee Cookies


The second cookie to make its appearance was Sugee Cookies. The recipe was posted by Gina in the Kitchen Capers Forum (thanks, Gina!). I baked them in 2 batches... The first one turned out too crunchy, while the second one was...well....a little chewy. I was kind of hoping for the melt-in-your-mouth texture again. But I think the cookies were too sweet for my liking - will reduce the sugar the next time i bake.


Calla's notes:
  • To try reducing the sugar as I felt that the cookies were too sweet.
  • The mixture also spread quite a bit during baking - to leave ample space between balls. Perhaps, I should leave the dough in the fridge for a while, prior to shaping them.

Searching for alternatives...

I will be slow in posting pictures as I am looking for an alternative source of posting pictures. Please be patient... I will update my posts with the pictures later.

2008 Chinese New Year Test Kitchen – Peanut Cookies


Last Sunday, I started off the day with baking peanut cookies. The recipe was obtained from Karlskrona who posted on the Imperial Kitchen (thanks, Karlskrona!). The recipe was certainly quite simple, really a 1-bowl cookie. It certainly didn't take long to churn out the following:


Here's a close-up....


Looks pretty, but hubby and dad thought that there could be more peanut flavour. Also, this cookie is too crunchy for my liking – I like this type of cookie to be melt-in-the-mouth. So, this went back to the test kitchen today for further experimentation. This time, peanuts were roasted (thanks, hubby!), peanut butter was added, balls were smaller and cooking time reduced. The results: more peanutty flavour and a melt-in-the mouth texture. However, I think I did a lousy job in glazing the cookies....somehow, it didn't have the lovely golden brown sheen....


Calla's notes on the recipe (I quartered the measurements):

  • I used deshelled peanuts in this recipe. I roasted them in the pan, leave it to cool, then grind.

  • I added approximately 2 tbsp peanut butter to enhance the peanutty flavour (re: ¼ recipe).


  • I used 85ml ground peanut oil to bind the dough together (re: ¼ recipe). This has to be monitored. I started off with 60ml, then add bit by bit till mixture binds into a dough that wipes the sides of the bowl clean.


  • I baked at about 160 deg C for 10 min, rotating the tray approximately after 5 min. I didn't use the top heating element this time, as I felt the oven was too hot. Perhaps that's why the tops did not have the sheen.

Tuesday, January 15, 2008

2008 Chinese New Year Test Kitchen – Prologue

Time flies - within a month, I will be ushering in a new year in the lunar calendar. With that in mind, I commenced experimenting what items to bake as gifts for the coming Chinese New Year. As long as time allows, the coming weekends will be designated as experiment time. Yesterday, I kick-start the first of the series with the following:

  • Peanut cookies

  • Sugee cookies

  • Cranberry swirl cheesecake


Too tired to upload now...Look out for the following posts!

Almost Like Famous Amos

The rest of the chocolate chip dough I made the other day were calling me from the fridge....So I think it's time to finish them. This time, I think I hit gold! I made smaller rounds (I think at most $1 coin in diameter - the dough was pretty "hard" after coming out from the fridge and it was easier making them small). The cookies turned out bite-size and were crunchy throughout! Hooray!! But too bad, I had to go out and did not have time to keep them upon cooling. After 4 hours in the open, the cookies went soggy. I put them back in the oven to toast them and they were crunchy again...but a LITTLE too crunchy for my liking. So I learnt that keeping the cookies immediately into air-tight containers when fully cooled is extremely important....

Well, here are some pics...

Don't they look lovely?...Makes me want to reach out for more....

These will definitely be part of my Chinese New Year Bakes – Mum has requested for these....


Thursday, January 10, 2008

Bogged Down with Cranberry Sauce....

During the festive season, I received a bottle of Crabtree and Evelyn Cranberry Sauce with Orange. Well, I'm not a "cooking" person, i.e. I don't really like to fry, steam, poach, etc.; but I like to bake! Strange huh....

As the sauce approaches its use-by date, I'm hard-pressed to find ways to use it in baking. Hence, I trawled the internet to look for ideas and found the following ideas/had the following inspiration:

I'm inclined to try the Cranberry Upside-down Muffins, any of the cupcake ideas and the Cranberry Swirl Cheesecake. I may even mix in the cranberry sauce into my muffin/cupcake batter and correspondingly reduce other liquids. Once done, I will share with you the results.

If you wish to have ideas on using cranberry sauce other than in baking, you may check out this site: http://www.musicbizadvice.com/15_ways_to_use_leftover_homemade_cranberry_sauce.htm. You could also check out Ocean Spray's recipe database for more ideas.

Do you have other ideas?? Please feel free to suggest....


Baking in Advance

I like to bake in advance or in bulk and store leftovers, so that I have cakes/cookies/pies to eat as and when I fancy. I know that cookie dough could be refrigerated or frozen and baked as and when one fancies. This also holds true for pastry. But what about cake batters? Very few recipes state that it is alright to refrigerate cake batters, then bake when fancy strikes.

I did a search on the internet. The general consensus is cake batters are not suitable for preparing in advance. This is because ingredients such as baking powder, baking soda (also known as bicarbonate of soda) start to react when they are in contact with liquid. If left standing around, the raising properties of baking powder and baking soda will diminish. I came across a suggestion to add baking soda/baking powder only prior to baking, i.e. leaving the baking powder/baking soda out entirely and only mix it in just before baking the cake.

The preferred alternative appears to be baking the cakes in advance and freeze them. To serve, bring them back to room temperature. Re-heating may not be advisable as the cake could dry up. In addition, although cakes with frosting/icing freeze well too, there are suggestions to frost/ice after the frozen cakes have thawed.

As a sidenote, if a cake calls for three pans when baking and only two are available, I came across a suggestion to store unused batter covered in the refrigerator while the other layers are baking. When the first two layers have cooled, remove the cake. Clean the pan, regrease and bake. The third layer may take an extra minute or two to bake.

In respect of pies, they can be frozen before or after cooking. If before cooking, it is advisable to keep the pastry and meat filling separate so that the pastry does not turn soggy. As for freezing baked pies, there is a possibility that the pastry turn soggy too.

Sources:

http://www.deliaonline.com/messageboard/7/34077/thread.html

http://www.deliaonline.com/messageboard/7/32892/thread.html

http://www.deliaonline.com/messageboard/7/39273/thread.html

http://www.deliaonline.com/messageboard/7/24987/thread.html

http://en.allexperts.com/q/Desserts-747/un-used-cake-mix.htm

http://www.hgtv.com/hgtv/ah_recipes_desserts_pastry/article/0,1801,HGTV_3175_3023656,00.html

http://www.deliaonline.com/messageboard/7/48495/thread.html

Wednesday, January 9, 2008

Favourite CCC Project - Project Alpha Update

Yesterday, I blogged about my first CCC project and mentioned that I will check out the texture today. I tried one in the evening and it was still crunchy! I'm extremely pleased - finally found a crispy CCC that stays crunchy and tastes good. This CCC will be one of my candidates for CNY cookies to give away to family and friends.

15 more CCC recipes to try.... need to test a chewy one soon....

Chocolate Lava Cake - Part II

In my last post about Chocolate Lava Cake, I mentioned about testing whether it would be cooked between 5 - 6 minutes using the top and bottom heat.

Today, I adjusted the baking times and heat as mentioned. The results? I will let the pictures do the "talking"....


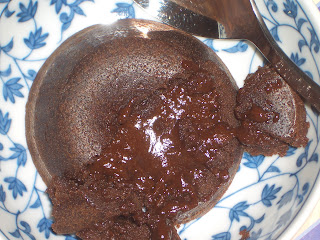
See how thin the shell is and how fluid the chocolate fudge is....yum....Hubby pronounced "Yes! This is the how I want it!!"

A thing to note: Although not noticeable to the naked eye, it appears, at least on the photo, that there are speckles in the chocolate fudge. However, the chocolate fudge feels smooth. Does anyone have any idea why?

Tuesday, January 8, 2008

Quest for my Favourite Chocolate Chip Cookie - Project Alpha


I've been on the quest for my favourite chocolate chip cookie for the longest time - ever since i started picking up baking. So far, I have not come across something that makes me exclaim "Yes! This is the ONE!!"

During my quest, I started to seriously list down the attributes of my favourite chocolate chip cookie. I realised that I like 2 types: crunchy - as "personified" by Famous Amos, and chewy - as "personified" by Mrs Fields. For crunchy cookies, these should be light, while the chewy counterparts should be crisp on the edge, but chewy in the centre. I'm not a fan on the thick and cakey cookies. I like my cookies not too think, and not too thin either.

I've tried many recipes. Some chewy(?) ones have a too-liquid batter and spread out too much during baking, becoming too thin to be eaten Some have been successful, but are capricious - turns out spectularly chewy on one day and very soft on other days. The chewy ones I've baked so far always turn crunchy within a few days, despite being kept in an air-tight container. Well, they always fare better than their crispy counterparts who turn soggy within days or even hours after baking. Crunchy is better than soggy - at least you can pull them off as "hey, they have always meant to be crispy...." :P Also the crispy ones I've tried invariably turn out cakey - not my desired outcome.

In my "To Do" recipe binder, I currently have 16(!) chocolate chip cookies recipes of all kinds: crispy, chewy, chocolate base, good old vanilla, with nutella, milk and white chips, butterscotch chips, etc. Prior to this, I have tried at least 6 other recipes, out of which 5 have been assessed as failures, either through my fault (lack of talent or proper technique) or the cookie didn't meet my expectations/criteria. The last one - a double choc chip cookie - was good, but capricious....can't do them on a rainy day - will turn soft. Good for the oldies though....

With this blog, I thought I should formalise my quest and document the observations and results of the 16 recipes (and most probably more to come) - much like doing a science experiment report in school. So without much further ado, here is the report for the first out of the 16 recipes adapted from here:

  • The dough was quite dry, making it difficult to mix in the chocolate chips to ensure that the chips are evenly distributed within the dough. Perhaps could try mixing in the chocolate chips first, then the flour - not sure if this is workable....

  • I bake the cookies using only bottom heat for the first 7 (if dough wasn't refridgerated) - 10 (if dough was refridgerated) minutes, then turn on the top heat to brown the cookies for the remaining cooking time.

  • For the first batch, I baked using the above method for 15 minutes. When cooled for about 10 minutes, cookie is crispy at the edges and appears to be cakey in the insides. Upon cooling, cookie firms up further and becomes less cakey. To observe the texture again tomorrow (or rather later today).

  • For the second batch, I left it in the fridge while baking the first batch and only took it out a few minutes prior to baking. Similarly, the cookies were baked initially with the bottom heat only and half-way through, the top heat was turned on. This batch was baked for approximately 20 min. There is no discernible difference in texture caused by refridgeration of the dough. This can be tested again as I have leftover batter kept in the fridge.

  • Verdict: to be kept open till I observe the texture later. As for taste-wise, it's a delicious cookie which is not too overbearing in the butter component. It is also easy to prepare.

Thanks, Connie, for sharing this recipe, and Didally for inspiring me to make this.

Now, let's present the pictures of Miss Chocolate Chip Cookie.....


Stay tuned for an update about the verdict of these lovely-looking missys (or hits??)....

Update on 9 January 2008

The cookie was still crunchy in the evening! This recipe is definitely a hit - butter is not overpowering, stays crunchy, no oily taste. Also, I think there is a need to keep a close look out at the last few minutes to bake the cookies as long as possible without burning to seal the crispiness.

Update on 15 January 2008

Making them in smaller rounds (I think at most $1 coin diameter) will yield them more bite-size and crunchy throughout - almost like Famous Amos. I left them in the refridgeratior, so it was easier to make them small than big. Baking time is about 15 minutes, so I guess, if the cookies were baked immediately, it should be shorter. Still the best way is to observe the cookies closely as they bake: as soon as the sides are browned, they can be removed from heat.

Monday, January 7, 2008

Chocolate Lava Cake


I have always been amazed by the CHOCOLATE cake, the one that has silky chocolate fudge oozing from the insides....yum.... This type of chocolate cake appears to be a staple of most western food restaurants/cafes, as a result, I find that I usually order this when I see it on the dessert menu.

I've wondered how the cake is done. Recently, I did a research and found that there are 2 ways to cooking this cake: (a) bake it quickly at high heat to cook the outsides only; (b) insert a chocolate truffle/ganache in the centre. To my delight, the ever-reliable Delia has a recipe for this. It seemed easy enough with the help of a mixer and did not require additional ingredients that my pantry didn't have. The only problem was I did not have suitable pudding basins to bake these delectable cakes in. This was solved when I saw suitable pudding basins which were within my budget at Sun Lik last week.

With the last obstacle cleared, I set out to bake the cakes soon after the purchase of basins. Sadly, I overbaked them, failing to take into account that my pudding basins were smaller than the ones prescribed by Delia. Nevertheless, it more than passed as a chocolatey sponge.

The next day, I tried again. This time success smiled upon me - the shells were thin and there was lots of fudge oozing from within..... I also tried a variation: put Marks and Spencers' "Cherry Liquers" into the centre, turning it into a pseudo black forest chocolate pudding. I passed this variation to Mum - she liked it, but still preferred the log from Wuthering Heights.

Hubby was delighted at the second attempt without the M&S "Cherry Liquers" and promptly pronounced it as his favourite chocolate cake. He has repeatedly requested for this cake subsequently and even asked me to bake it for CNY reunion dinner in Malaysia!

Today is my 3rd attempt baking it...upon the request of my dearest Hubby and my lovely
Brother who wishes to see the cakes...

YY, here are some pics for your drooling viewing pleasure...

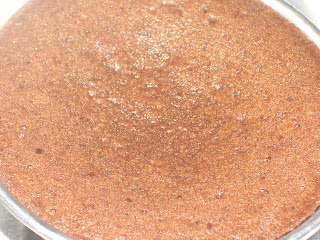
Prior to baking


After baking, before unmoulding


Sitting pretty in a plate saying "Eat Me"


Alice passed by and poked the cake...


Alice gave into temptation and ate it....


Alice's verdict: although the chocolate sponge was light, there was not enough chocolate fudge oozing from the cake (guess I overbaked it slightly). Nevertheless, it was chocolate intensity - Alice flew to heaven. Luckily, Alice did not grow upwards, but wasn't sure if she had grown sideways instead.....

Calla's notes on the recipe:
  • I omitted the brandy - it doesn't appear to affect the taste of the cake.
  • It's done when the top looks cooked - when you shake the mould, the mixture does not quiver. The cake also shrinks from the side of the mould.
  • I remembered baking it for about 5 - 6 minutes on my 2nd attempt. However, I forgot if the top and bottom heat were switched on. I will experiment again.
I have leftover batter from today's baking session - will try them at the revised time and cooking method and post an update about the results....stay tuned!

Update on 9 January 2008

I turned on the top and bottom heat and baked for about 6 minutes. The results were good! Please refer to this post for the pictures.

Sunday, January 6, 2008

Apple Pie


Hubby has been requesting for an apple pie for a while. However, I have put his request aside as I'm bad at making pastry. Somehow, dough and me don't mix well together :(

My fears were put aside when I came across Delia's recipe for gooseberry pie. The crust sounded pretty easy to do - so I thought I could make use of the crust and turn it into an apple pie instead. It seemed like a workable idea as Delia had substituted rhubarbs for gooseberries.

Hence with all my gungho, I set out making the apple pie this evening. I was a little disorganised initially, but the dough was not too difficult to handle - thankfully! Within an hour, the kitchen was filled with homely smells of cinnamon and sugar.

The pie turned out quite nicely. Hubby loved it so much that he polished 2 slices in one go. I gave mum and dad a slice too. Mum said that it was delicious.

Maybe I could try with gooseberries the next time - perhaps YY could bring some gooseberries back when he returns home during summer :D

Here are some pics for you to enjoy. Sorry, we forgot to take pics before cutting the pie - we were too excited....


Calla's notes on the apple pie:
  • I used granny smith apples.
  • I replaced lard with an equivalent amount of butter. Crust was still crunchy, in my opinion.
  • I replaced caster sugar with brown sugar for sprinkling onto each layer of apples. I also sprinkled cinnamon onto each layer of fruit.
  • I baked at a centre shelf, with no adverse effects. I simply baked till the crust turns golden brown.

Purpose of this blog

Hi!

This is my first post. Well, my purpose of keeping this blog is mainly a means of keeping in touch with my dear brother who's thousands of miles away. I wish to share with him my bakes and other interesting snippets of my life. This blog also will document my trials and tribulations
(!) of baking.

If you are a first time visitor to my blog, thank you and may you have an enjoyable visit!